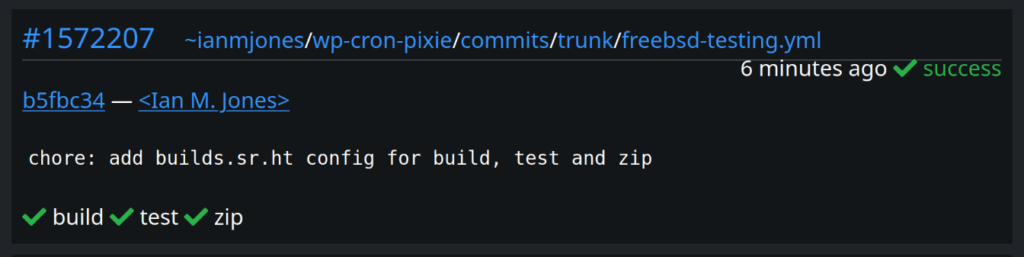
Wow, I just created a new config for builds.sr.ht that worked first time!
That never happens, who ever creates a CI/CD config that runs without error when first submitted?!
Admittedly, not the most complicated of configs, but I suspect using Gleam and FreeBSD helped due to their simplicity and well thought out straight forward usage patterns.
I’ve just released v1.1.1 of Snippet Expander, “Your little expandable text snippets helper, for Linux”.
It’s just a small bug fix release to make setting the shortcut for opening the Search & Paste window a little less confusing, particularly on KDE Plasma.
Changelog:
* Ensure custom shortcut setting only shown in UI if using GNOME(ish) desktop
* Add default Ctrl+` Search & Paste window shortcut to KDE Settings app
I’ll give a little more detail in the next few sections, but first, here’s the changelog:
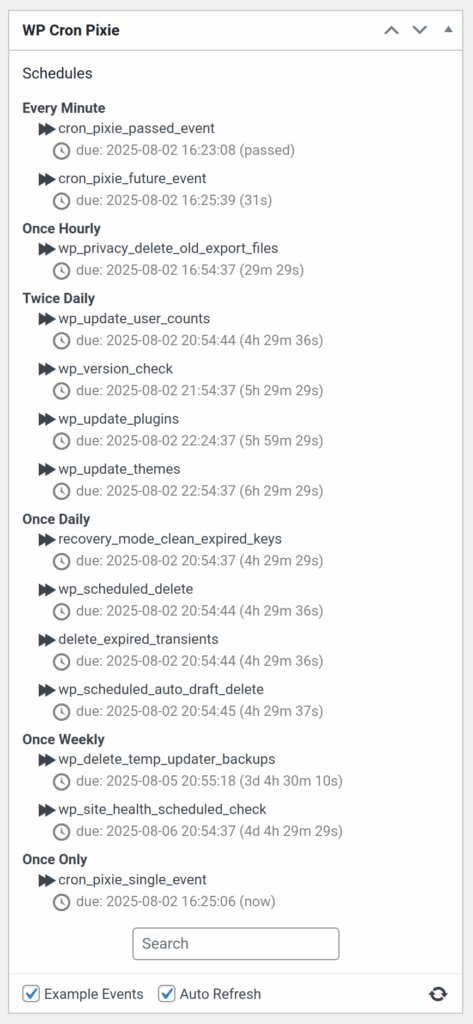
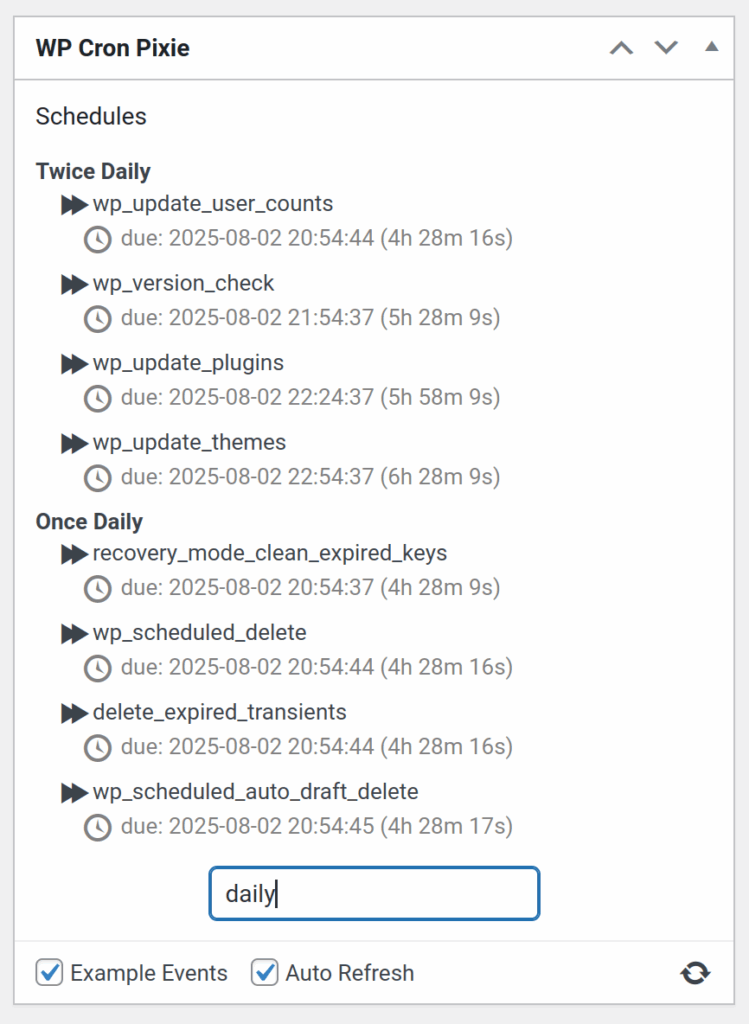
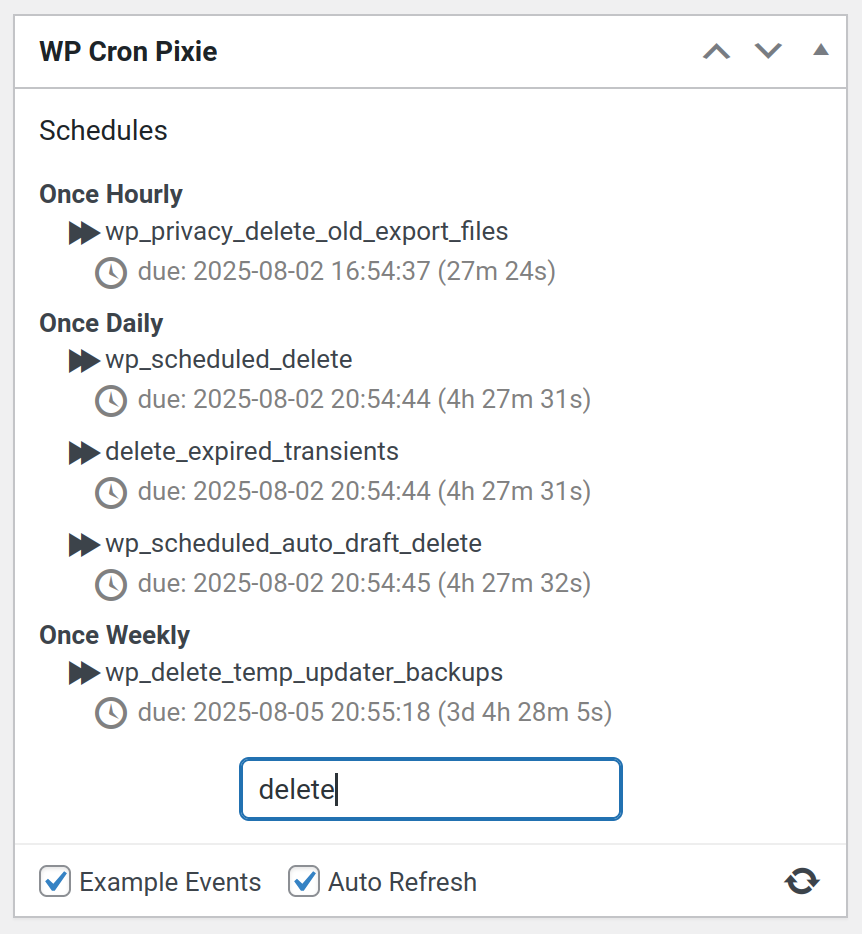
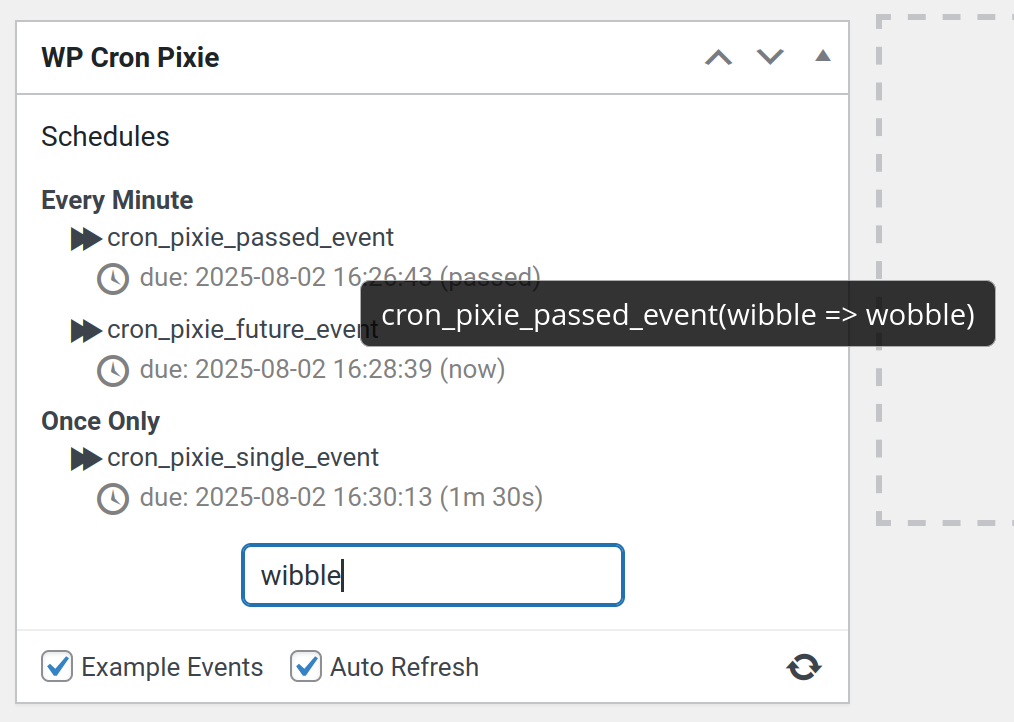
* Added search of schedules and events.
* Added display of event hook with args when mouse hovers over event name.
* Auto refresh setting is now saved for each user.
And shortly after v1.6.1 was released, WP Cron Pixie v1.6.1 was released too, with the following one line changelog:
* Example events setting is now saved for each subsite in a multisite install.
Search schedules & events
It’s now possible to search your site’s cron schedules and events, very helpful on a site with lots of events and custom schedules.
The search box can be found below the list of schedules and events.
If you enter some text into the search box that matches part of one or more schedule’s name, the list of schedules will be filtered to those schedules and their events.
In a similar way, if you enter search text that matches on part of a cron event’s name, it will be shown along with its schedule, but other events in the same schedule that do not match the search query will not be shown.
Display event hook’s arguments
When you search for something that happens to occur in a cron event’s hook arguments, the corresponding event is shown. That would be quite confusing unless you could see what the event’s hook arguments are, so now when you hover your mouse cursor over an event’s name, it shows the hook with it’s arguments.
Per-user auto refresh setting
While developing the search functionality detailed above, which also saves the last entered search text so it is restored when you return to the admin dashboard, I realised WP Cron Pixie wasn’t saving its settings at quite the right level.
Before WP Cron Pixie v1.6.0, all settings were saved at the site level, or on a multisite, at the network level.
Now, the Auto Refresh setting is saved per user as each user may have a different preference as to whether they want the cron schedules to automatically refresh or not.
The Example Events setting remains at the site level as when enabled it creates cron events for the entire site and is unable to be scoped to just a single user. However, while writing this very blog post I realised that the plugin was saving the Example Events setting at the network level for a multisite install, which makes no sense as WP-Cron runs in subsites, not at the network level. Hence how WP Cron Pixie v1.6.1 came into being, ensuring that the plugin can create its example events on any multisite subsite it is used on.
For a long long time (I have no idea how long it really was), I used the venerable Nord theme colours to theme my desktop and apps, and even my old website.
Then, when I rebooted my website, I just went with ye olde Twenty Fifteen theme, using the dark theme, it kinda worked well as a reflection of the colours I was using everywhere else in my digital life, and therefore screenshots I posted didn’t look out of place.
However, I’ve not been too happy with how my blog posts look in the Twenty Fifteen theme, the content area is just too thin for the type of code and screenshot heavy content I post. It wasn’t a great reading experience. So I felt it was time to find a new theme.
I wanted something super simple with a nice wide or easily altered content area, and preferably a Nord colour scheme, or super simple palette that I could alter to Nord colours, because I miss using that colour scheme, and for reasons I’ll go to into a second, it’ll match any screenshots going forward.
After not much looking around actually, I found the Blockbase theme, which is about as simple as it gets.
And after just a couple of quick tweaks, I got it to something which I really like, and so this here website now looks something like the following screenshot.
“What?! I thought you’d fallen back in love with Solus?”
… I hear you ask.
Well, I do still absolutely love Solus, it’s an awesome Linux distribution, so fast and simple to use, but I’ve been hitting a show stopper issue with running Docker projects that the maintainers have struggled to fix, and a few other smaller day to day problems that over time built up to make me start looking around for another distro.
After playing with a few BSD and Linux distros again, I thought I’d give COSMIC Epoch a another go to see how it’s progressed since I last gave it a spin early last year.
Even though it is definitely an alpha as a few feature aren’t complete, and being based on Ubuntu 24.04 LTS is a bit painful, it’s so good to have a working Docker setup again, and I really like the COSMIC desktop in tiling mode.
To be fair, I generally use one app per workspace, but the shortcuts that the peeps at System76 have set as the defaults are spot on, and work very well for me when navigating workspaces etc.
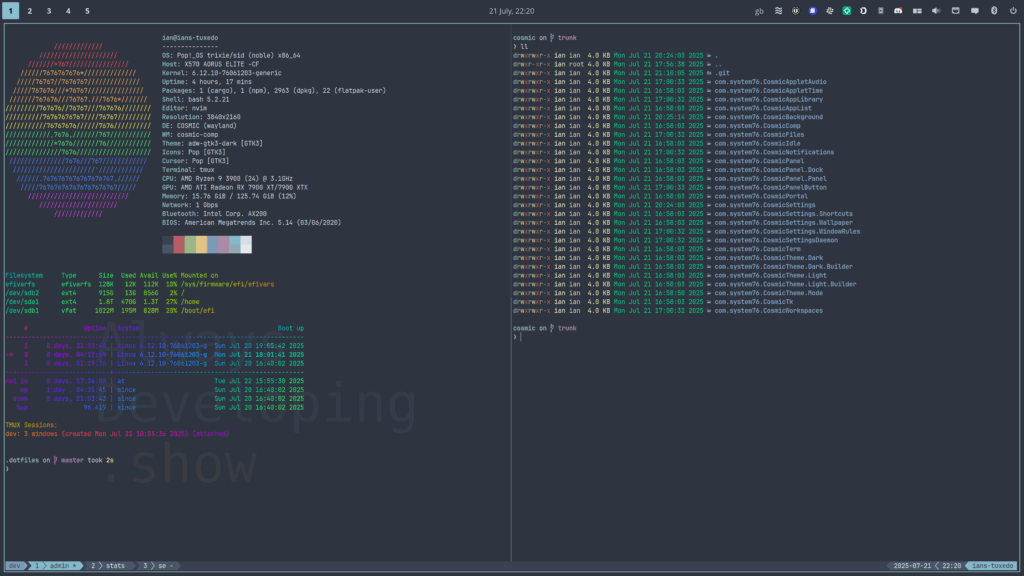
In the above screenshot you might just be able to work out that I have my COSMIC config checked into a git repo, which means I can easily use it across all my desktops by checking it out to ~/.config/cosmic. When I saw Jeremy Soller demo that it’s safe to do that in a recent presentation, that was a clincher to get me to try COSMIC again. I’m glad I did.
I did initially try keeping my cosmic config in my ~/.dotfiles repo, which I then use stow to put into place. However, every now and then COSMIC would clobber the ~/.config/cosmic symlink, creating a directory in its place. So I switched to making it a directory itself, which just so happens to be a git repo so that I can track my changes and push them out to all my Pop!_OS machines. That seems to be working very well.
And now that I’m back to using Nord for all the things, if I finally get back to making videos for my YouTube channel again, at least I won’t need to change my thumbnail theme!
There’s a brand new version of WP Cron Pixie available to install, and with luck, even though it’s changed immensely under the hood, you’ll not see any difference compared to the previous version! 😄
WP Cron Pixie is a little WordPress dashboard widget to view the WordPress cron, and run an event now rather than later.
Gleam Front End
The front end has been rewritten in Gleam, a “friendly language for building type-safe systems that scale“!
Back in May 2023 I got interested in Gleam after seeing Kris Jenkins interview Louis Pilfold on the Developer Voices podcast, I loved the idea of a type safe functional language with a clean but familiar syntax, that compiles to Erlang to run on the BEAM, or to JavaScript to run basically everywhere.
I recorded a few episodes, but alas, life got in the way, and I stopped recording videos for my YouTube channel while distracted by some personal and work projects, including moving house.
It’s only recently that things have settled down a little, and I’ve started to have a bit of time to start working on personal software projects again. Unfortunately my new home office is a horrible echo producing machine, so I can’t currently record any videos. So, until I can shoe-horn some soft surfaces into my small office to dampen the sound, I’m just enjoying working on projects without someone watching over my shoulder. 😉
Since I first started this project over a year ago, a bunch of things have improved in the world of Gleam, including decoders, which is what I’d been working on at the time I stopped. This meant I had to change quite a bit of the Gleam code I’d already written for decoding the data loaded by the widget when first shown, but to be fair, I hadn’t really got much done yet anyway.
I found the new decoder setup really nice, if still a little tricky to get my head around at first, but after a bit of help via the super nice folks in the Discord community, I was off and running. I built a bunch of data decoding into a data module, using TDD to make sure it all worked even though I had no UI yet to view the decoded data.
And of course, although I used watchexec to continuously run the tests and build and install the plugin into my local test site every time I saved changes, I also set up a concourse-ci.yml file to make sure any commits I pushed up to the repo got tested by my dinky little Concourse CI server.
With the initial data being correctly decoded as flags for the Lustre based UI, I found it relatively quick and easy to build out the UI given that I could effectively copy the same layout as I’d used in the Elm version.
I started off the UI rendering conversion by simply grabbing the output HTML from WP Cron Pixie .1.4.4, and using Louis’ HTML to Lustre Converter to get a static rendering using Lustre syntax. From there, I chopped up the pieces into separate views to handle converting the data Model into things like a list of cron schedules, each with a list of cron jobs, while retaining the same classes that the existing CSS used. In the end, I don’t think I changed the CSS at all.
Compared to how I’d structured the Elm code, I did make some small improvements along the way while building out the UI in Gleam and Lustre, but having the Elm code for reference definitely sped up the development time. The UI code is looking pretty sweet if you ask me! 😊
One thing that is different in Gleam and Lustre compared to Elm is how you make a timer, like what I needed to trigger the auto-refresh of the UI every 5 seconds. In Elm you have subscriptions, and can subscribe to a time tick. However, with Lustre, there is no built in subscription feature, but it does still have effects, and Gleam has a very powerful foreign function interface (FFI) mechanism. This meant I could create a very simple JavaScript timer:
/**
* Start a periodic timer that fires a callback on a regular cadence.
*
* @param {int} interval Seconds between each tick.
* @param {object} callback A function to be called on each tick.
*/
export function set_interval(interval, callback) {
window.setInterval(callback, interval * 1000);
}
Hooking up the change events in the form fields in the widget’s settings footer, and handling clicks was super easy with Lustre, and Bob’s yer Uncle, I had a fully working WordPress widget using Gleam for building the UI.
Back End Improvements
Having built out the UI with Gleam, I then set about improving the back end PHP code.
I made quite a few changes, fixed a couple of bugs, improved security, separated the AJAX handing code from the underlying handling code in case I decide to switch to a WP-REST-API mechanism, and generally cleaned things up.
To aid with the cleanup, I added PHPStan and PHP_CodeSniffer to the mix to perform static analysis and code style checks respectively.
PHPStan is currently passing at level 9, just one step down from the max of 10, which is unfortunately impossible to get to due to some of the referenced WordPress functions, and with only a couple of ignored rules that are due to the way a couple of WP cron functions need to be used.
Likewise, the PHP_CodeSniffer checks are passing all the extended WordPress rules, with just an exclusion because the plugin needs to create its own cron schedule, and the ruleset is currently using a deprecated rule that naturally needs to be skipped.
That Was Fun
All in all, I had a lot of fun rewriting WP Cron Pixie’s UI in Gleam, and improving the PHP side of things too.
I am now thinking about what improvements I can make to WP Cron Pixie, might have a crack at using Birdie to snapshot test the UI, and wondering what my next Gleam based project will be as I’ve definitely got the “Gleam ALL THE THINGS” bug!
Turns out, running PHPStan in a Docker based Concourse CI environment on a dinky little $6 DigitalOcean Droplet just isn’t going to cut it.
I always planned on updating the Droplet to something with at least 2 CPUs, once I had a few bits and bobs running on it, didn’t expect running PHPStan on WP Cron Pixie’s code base to be the reason. 🤷
# on sourcehut, create new repo, then ...
git clone --bare git@github.com:ianmjones/wp-cron-pixie.git
cd wp-cron-pixie.git/
git branch -m master trunk # optional, rename default branch
git push --mirror git@git.sr.ht:~ianmjones/wp-cron-pixie
# on sourcehut, update default branch in repo's settings if not correct.
cd ../
rm -rf wp-cron-pixie.git
git clone git@git.sr.ht:~ianmjones/wp-cron-pixie
cd wp-cron-pixie/
# Check everything is as expected ...
git branch -a
git tag -l
# on github, archive old repo.
In my previous Kamal Deploy Concourse CI article I showed how I set up a small personal Concourse CI server via Kamal, and added an example “Hello, World!” pipeline to make sure it worked.
In this article I’ll show you how I then created a git commit triggered self updating Concourse CI pipeline for a bare-bones Gleam project, hosted in a private git repository. The pipeline also demonstrates the simple mechanism used for ensuring that a couple of parallel jobs have to be successful before a later job is allowed to run.
Create new Gleam project
First up, I created a new Gleam project, skipping creation of GitHub specific bits as I use SourceHut for my git hosting:
gleam new --skip-github test_gleam
Then, I followed the instructions to make sure the new project was testable:
cd test_gleam/
gleam test
I also made sure it actually ran:
gleam run
This is what that all looked like:
When you look at src/test_gleam.gleam, you can see it’s a super simple app:
The test file in test/test_gleam_test.gleam is similarly simple:
import gleeunit
import gleeunit/should
pub fn main() -> Nil {
gleeunit.main()
}
// gleeunit test functions end in `_test`
pub fn hello_world_test() {
1
|> should.equal(1)
}
You’ll notice that it doesn’t actually test the app’s code, but just proves that tests can be run. I’ll sort that out later, it’ll be a good test of the Concourse pipeline being triggered on git commit.
Before going any further, I committed the project to git, and pushed to a new remote repo on SourceHut:
git add .
git ci -m "feat: say hello"
git remote add origin git@git.sr.ht:~ianmjones/test_gleam
git push --set-upstream origin trunk
As seen in the following screenshot, that resulted in SourceHut setting up a new private repository for me:
I only needed one resource (a.k.a. external item), of typegit, referencing the git repository where the test_gleam project lived.
I haven’t specified a check interval, so it’ll use the default of running a super light check for new commits every minute.
I’m using the git@... form of the repo URL so that should I wish, I could in the future add steps to the pipeline that push changes back to the repo, although that’s not something I’ve done in the version of the pipeline I created.
If you followed the link to see details of the git resource type, you may have noticed that for a private repo you’ll need some way of supplying credentials for accessing the repo for pull or push. This is usually with the private_key: property, which just supplies a SSH private key as a multi-line string, but I’ve not got that here, as I did not want to commit a private key to the git repo. So how did I grant access to the repo for the pipeline?
This was probably the trickiest part of creating the pipeline when using Concourse deployed via Kamal, as I found there were a number of issues with trying to pass the private key string down into Concourse through a Kamal secret env var without issues with the way the formatted string is handled.
In the end, I found out about how you can configure defaults for resource types by passing down a CONCOURSE_BASE_RESOURCE_TYPE_DEFAULTS env var that points to a YAML file that specifies some resource type configuration to be added across the Concourse cluster. This was perfect for my needs as it meant I could create a private key in 1Password specifically for Concourse, add its public key to SourceHut to grant access to the repo, and during deploy with Kamal, dump a YAML file 1Password attachment with private_key: filled in into a know place on the server, and have it mounted into the Concourse container so it could pick it up.
I’ll show more details about that later in the article when I talk about the changes I made to the Kamal config.
Jobs:
The rest of the pipeline is purely jobs to be run.
In this job, it periodically checks the git “repo” resource, and it only runs if there is a new commit.
All it does is look for a file called concourse-ci.yml in the root of the repo, and updates the configuration of the pipeline with its contents.
This is how, after a first manual set of the pipeline, any changes can then be applied by committing changes to the concourse-ci.yml file and pushing to the SourceHut repo.
Job: test
- name: test
plan:
- get: repo
trigger: true
passed: [reconfigure-self]
- task: gleam-test
config: &gleam-config
platform: linux
image_resource:
type: registry-image
source:
repository: ghcr.io/gleam-lang/gleam
tag: nightly-erlang
inputs:
- name: repo
run:
path: sh
args:
- -cx
- |
cd repo
gleam test
The test job boils down to using the GitHub hostedghcr.io/gleam-lang/gleam container to run gleam test.
It too checks the “repo” resource to see if there are commits to trigger a run of the job, but it will only run if the reconfigure-self job has passed first.
After a couple of iterations I simplified the other Gleam related jobs later in the pipeline by referencing this job’s config in their task definition. That’s why I have config: &gleam-config in this job, which is called an anchor.
This is basically the same as the test job, except it runs gleam build in the container. It’ll run in parallel with the test job, and it too waits for the reconfigure-self job to pass before it’ll run.
The <<: *gleam-config bit pulls in the config from the test job in such a way that it can be partially overridden. I overrode the run: definition so that it runs a build rather than running the tests.
Job: run
- name: run
plan:
- get: repo
trigger: true
passed: [test,build]
- task: gleam-run
config:
<<: *gleam-config
run:
path: sh
args:
- -cx
- |
cd repo
gleam run
The final job is to run gleam run, and by now you probably understand everything in it as it’s almost the same as the build job I just showed you.
The one notable difference is passed: [test,build], which just tells this job to only run if both the test and build jobs have passed.
Update Kamal config
There were a couple of changes I made to my kamal-deploy-concourse-ci repo compared to what I initially showed you in my previous Kamal Deploy Concourse CI article.
All this does is mount a .kamal/apps/concourse-ci directory from where Kamal runs the CI container on the server into the main Concourse container with path /app/concourse-ci.
The second update that adds an entry to the env: key will give you an idea as to why the above volume was needed:
As mentioned at the end of the resources: section earlier in this article, this CONCOURSE_BASE_RESOURCE_TYPE_DEFAULTS variable tells Concourse where to pick up a YAML file that includes some default values for some resource types.
As you can see, Concourse is told that there will be a type-defaults.yml file in the /app/concourse-ci directory, which is actually mounted from the server’s ~/.kamal/apps/ci/concourse-ci directory.
The ~/.kamal/apps/ci directory is created by Kamal for the ci service I’ve defined, and in the next change to my kamal-deploy-concourse-ci repo is where I’ll show you how I created the concourse-ci/type-defaults.yml file under there, and with what contents.
.kamal/hooks/pre-app-boot
I added a new Kamal hooks file called .kamal/hooks/pre-app-boot that handles putting the type-defaults.yml file onto the server during the deploy of the app:
#!/bin/sh
echo "Booting $KAMAL_SERVICE version $KAMAL_VERSION on $KAMAL_HOSTS..."
set -euo pipefail
#
# Make sure we get the latest version of concourse-ci-type-defaults.yml
#
rm -f .kamal/concourse-ci-type-defaults.yml
op read --out-file .kamal/concourse-ci-type-defaults.yml op://Private/imj-ci/concourse-ci-type-defaults.yml
#
# Push the concourse-ci-type-defaults.yml file to each server where the app is running.
#
for ip in ${KAMAL_HOSTS//,/ }; do
sftp root@"${ip}" <<-EOF
mkdir .kamal/apps/${KAMAL_SERVICE}/concourse-ci
put .kamal/concourse-ci-type-defaults.yml .kamal/apps/${KAMAL_SERVICE}/concourse-ci/type-defaults.yml
EOF
done
#
# Clean up.
#
rm -f .kamal/concourse-ci-type-defaults.yml
The main things this script does is:
Remove a local .kamal/concourse-ci-type-defaults.yml file if it exists.
Save a concourse-ci-type-defaults.yml file attached to a “imj-ci” item in my “Private” 1Password vault to .kamal/concourse-ci-type-defaults.yml.
For every server that the app is being deployed to …
Make sure the .kamal/apps/${KAMAL_SERVICE}/concourse-ci directory exists (where KAMAL_SERVICE will be “ci” in my case).
Upload the .kamal/concourse-ci-type-defaults.yml file into the new directory, renamed as type-defaults.yml.
Remove the local .kamal/concourse-ci-type-defaults.yml file.
In 1Password, attached to the “imj-ci” item in my “Private” vault, I had a concourse-ci-type-defaults.yml file that looked something like the following (I’ve obviously replaced the private key’s contents with gibberish):
When that file is picked up by Concourse, it’ll add the private_key: to any use of the git: resource type in the cluster, giving it a private key whose associated public key I’ve granted access to my SourceHut repos.
Kamal (re)deploy Concourse CI!
With the Concourse CI pipeline ready to be used, and Kamal config files also ready to be used, it was time to commit the changes to my kamal-deploy-concourse-ci repo, and deploy the changes to https://ci.ianmjones.com:
git add .
git ci -m "feat: add private ssh key to enable access to private git repos"
git push
kamal deploy
Which looked something like this:
Create Pipeline
Then it was time to manually set the pipeline to get it added to Concourse, after I added it to the Gleam project repo:
Because this was the first run, it took a little while as Concourse had to pull down the Gleam container, but later runs should be quicker with the container cached:
I now had a working Concourse CI pipeline for building and testing a Gleam project, with a gated job that could be used for deploying to production, but for me just runs the “Hello, World!” app.
Update Gleam tests to check CI runs
So that’s cool, but I wanted to make sure any changes to the git repo would trigger a run of the pipeline.
So I updated the Gleam code so that the tests were more relevant.
Here I just broke out the creation of the greeting text to its own hello() function, and passed its output to the terminal via the pipe operator.
test/test_gleam_test.gleam
import gleeunit
import gleeunit/should
import test_gleam
pub fn main() -> Nil {
gleeunit.main()
}
// gleeunit test functions end in `_test`
pub fn hello_world_test() {
test_gleam.hello()
|> should.equal("Hello, World!")
}
In the tests I imported the test_gleam module, called test_gleam.hello() and passed its output to a check of the output, which I’d changed to “Hello, World!”.
All I needed to do then was commit and push the changes, and the Concourse CI pipeline ran as expected, and faster as the Gleam container was now cached:
When I looked at the details for the “run” job, I could see the second run, and its “Hello, World!” output:
Wrap Up
I now have a neat little template for setting up a Concourse pipeline for any Gleam project I might tackle. In fact, projects in pretty much any language where it’s easy enough to grab a container with a reasonable runtime.
My template pipeline is self updating after the first manual “set”, and should work with any private git repo now that my Concourse CI instance has its own private key.
I hope that was useful, if you have any questions or comments, please drop me a line.